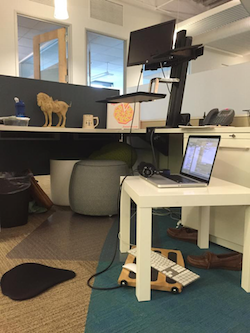
The author’s actual office.
Back in 2012, I Macgyver’ed my first standing workstation from common doohickies sitting around my office, cobbling together boxes, books, and binders into an ergonomic solution that treated me comfortably for the months.
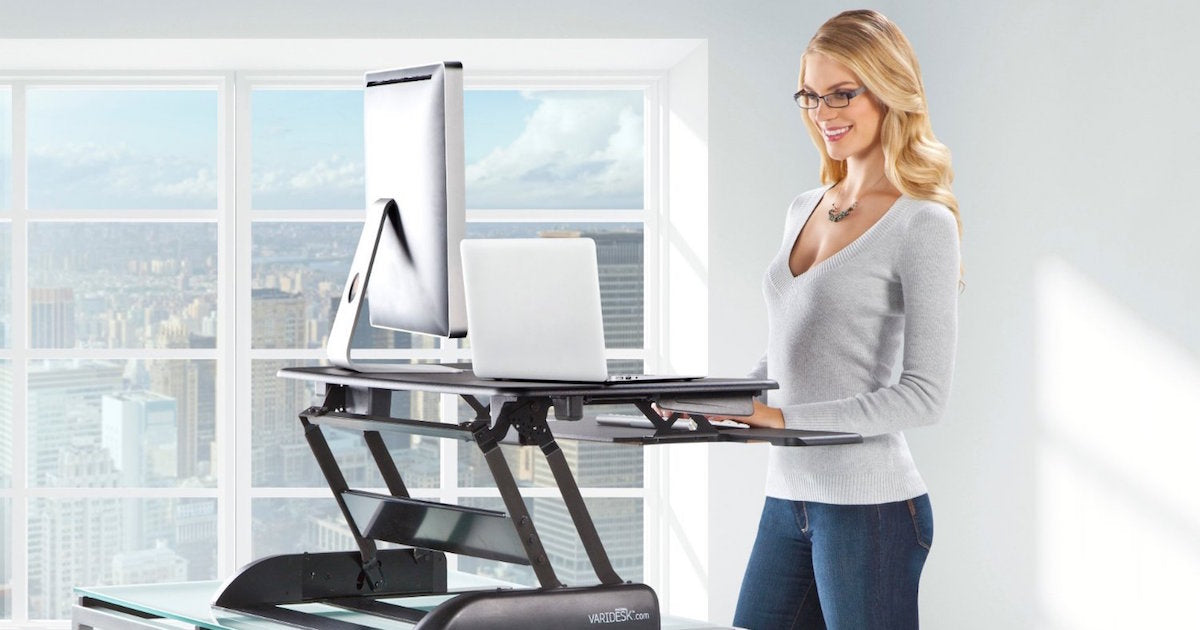
Then my company ordered us “proper” sit-to-stand desk attachments. I’m sooo glad I didn’t wait.
Even today, I augment my several hundred dollars of “fancy” corporate-bought equipment with some of my original DIY hacks.
The title of this post is no joke.
I didn’t spend a cent of company money to set up my first standing desk, and you probably won’t need to either – at least, not until you’ve figured out whether you want one to begin with.
There are some ergonomic upgrades we think are definitely worth purchasing, like a great mat or vertical mouse. But you can get a lot of improvement without opening your wallet.
And since your workdays (and your body’s movement requirements) encompass more than just the time you spend at your desk, I’ve made sure that my recommendations in this article go beyond simple equipment setup.
As you read, think about your ergonomics in terms of the quality and variety of body positions you adopt throughout the day, and how frequently you transition between those positions.
Quality, variety, and frequency of movement – all three matter very much!
(1) Raise your screen to eye level
I don’t care whether you sit, stand, crouch, kneel, squat, or all-of-the-above at your desk: as much as you can, keep your head at a level, neutral position when working for extended periods.
Doing so keeps you from unevenly stressing the muscles and soft tissues in your neck, chest, and back that work to support the bowling ball-sized poundage that is your noggin.
This means raising the height of your computer screen so that the top of the screen is 1.5-2 inches above eye level (for 17-23″ monitors) or 2.5-3 inches above eye level (for 24″ and larger).
It may seem weird to not put your eyes right in the middle, but human field of view is not symmetric up and down. You can experiment with this by staring straight ahead and lowering one finger from overhead until it reaches your field of vision and doing the same for raising a finger from waist-level.
Next, tilt your monitor (10-20 degrees from vertical) so that the bottom edge is slightly closer to you than the top. This also complements the natural field of view while leaving your head in the proper position.
Finally, place your computer screen as far away from you as possible (OSHA recommends 20-40 inches). The greater the distance the better it is for your eyes, as long as you can comfortably view the image detail.
You can adjust the height by placing your monitor (or laptop when using an external keyboard) on a pile of books, papers, or even up to full standing height by adding a cardboard movers’ box to the stack.
Maintaining a relaxed, restful head position prevents the unnecessary back, shoulder, and neck strain you would otherwise develop over years of compromising your working posture to accommodate an ill-positioned computer screen.
If you’re forced to work for extended periods at a laptop, plan to alternate this ergonomic catastrophe between two heights so you can alternate between poor arm and shoulder position and poor head and neck position.
Once you’ve solved the screen height problem, it is still your responsibility to break any “head creep” habits you may have developed over the years. This means catching yourself in the act every time your head slides forward toward your screen as you work.
Fortunately, this nasty habit becomes less automatic when your screen is adjusted to an appropriate height for your head, but it does take awareness on top of ergonomic adjustments to break a years-long “head creep” habit!
If you don’t touch type well, start improving today. It is pretty easy to learn with focused attention and can do wonders for your head and neck position.
Now that you’ve taken this first stab at remolding your environment to suit your needs, you might notice that most elements of your work environment are not truly fixed – if you care to unfix them.
For instance, with a higher screen, you can raise up your chair (if you’ve decided to keep it!) to increase the vertical distance between your shoulders and your keyboard. By playing with your standing or sitting height relative to your keyboard, you can find a sweet spot where you are no longer “shrugging up” your shoulders in order to type.
Instead, at the right “shoulder height”, you can let your shoulders drop back down into a relaxed posture, and let them hang loose while your fingers and wrists jam away. And speaking of fingers, wrists, and keyboards…
(2) Slant your keyboard on a three-ring binder
We’ve explained before why you want a negative tilt keyboard tray, because the optimal keyboard position for your hands, wrists, forearms, and shoulders is that which allows those parts to rest in as neutral a position as possible.
Just as you want to avoid tilting your head or sticking your neck out for long periods of screen time, because doing so creates uneven loads on opposing sides of your head’s supporting structures, so should you avoid “kinking” at your wrists while the complex and delicate structures in your hands and fingers flutter away during long bouts of typing.
You can reduce the workload placed on these parts by setting your keyboard on a three-ring binder so that it slopes down-and-away from you, allowing you to type with straight, relaxed wrists.
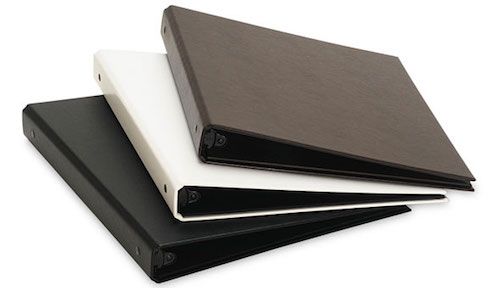
Since I use a very thin keyboard (one of the aluminum Apple keyboards), I will wedge a three-inch binder underneath it to get just the right amount of elevation-and-slant for relaxed touch typing.
Depending on your keyboard’s form factor, play with a combination of sitting/standing “shoulder height” and binder thickness that works for you. When you find the sweet spot, you’ll know it: it will be whatever configuration that allows you to keep your shoulders loose and “un-shrugged”, and your wrists relaxed and unbent.
As these adjustments allow your habitually-tensed structures to unwind over time, continue to be aware of how long and how comfortably you can maintain your working postures, and whether fine motor skills (like typing speed) change as well.
Most of all, remember that our bodies are always changing, so give yourself permission to continue tinkering with your work environment from day to day, because your needs will likely change!
(3) Take eye breaks
Now that your “desk endurance” is improving from your improved workstation, it is even more important to remember to take breaks from screen time!
A popular rule-of-thumb is to follow the 20-20-20 rule: Every 20 minutes, focus your eyes on something 20 feet away for 20 seconds.
While this is a fine starting point, I’ve personally gotten much more mileage from my eye breaks with two effortless tweaks.
First, I take my breaks at a window where I can focus on distances that are hundreds of feet away, rather than mere tens of feet, in order to benefit from a wider variety of eye-muscle ranges-of-motion that are impossible to exercise within the confines of an office floor plan, where my visual range-of-motion tops out against interior walls that are less than a hundred feet away. It is only with the help of a window that I can access the extreme focal distances my eye muscles need to fully relax into their furthest ranges-of-motion. Give it a try – it’s a great feeling!
Second, I make a conscious effort to totally relax my facial expression during my eye break. If my face or eyes feel especially strained after an intensive work sprint, I’ll stimulate facial relaxation by lightly massaging the muscles above and below my eye sockets, by applying smooth, gentle pressure along the lengths of the bony prominences of my brow (above the eyes) and tops of my cheekbones (below my eyes). I’ll “scrub” these two areas in an outward-sweeping motion with the inside of my index finger knuckle, alternating above and below my eyes, for a few repetitions while raising-and-dropping my eyebrows to enhance the “stretch sensation” of the massage. After a few slow repetitions, I can feel my face and eyes sink into a state of deep relaxation, and I’ll set my gaze out at distant clouds or trees and relax even deeper.
So go find a window and practice your thousand-yard stare. Or better yet – go outside and do the same! Which brings me to…
(4) Take walking breaks
Seriously, folks. Your body was made to walk. This aspect of human health is absolutely non-negotiable.
No matter what sort of “fitness program” you stack on top of your sedentary work life, you can’t weight-lift, yoga, or triathlon your way out of the biological fact that your body’s cells require walking as a mechanical stimulus to drive chemical processes that are essential to life.
When we walk, we create and experience specific mechanical loads that travel through every cell of our body, causing each cell to stretch, compress, twist, shear, and otherwise change shape in many precise ways that would not happen if we did not walk (or if we ran, cycled, or swam instead of walking). Regular movement is crucial to human health, and sitting still (or standing still) for long periods is damaging and uncomfortable.
Walking, more than any other category of full-body movement, has been so fundamental to our evolutionary history that our bodies have evolved to expect a certain amount of it on a regular basis, and things will go wrong when it doesn’t happen.
Normal metabolism in your tissues produces locally toxic byproducts that require muscular contractions for efficient transport into the blood stream where they can then be disposed.
Therefore, relegating your walking and other movements to isolated 45-minute periods creates long stretches where your cells stew in their own filth. This hinders your body’s ability to maintain and rebuild itself.
Meanwhile, the joints, bones, soft tissues, and muscles of your feet, ankles, legs, hips, back, arms, and literally every other observable part of you all move and massage one another in very specific ways as you walk. To learn more, see this excellent article written by biomechanist Katy Bowman, whose writings venture far and wide into this complex (and fascinating) topic.
And as I like to say, it’s always about feeling good now AND feeling good later: so treat walking breaks as a tactic for improving immediate-term wellbeing and productivity AND as part of a long-term health strategy.
By splitting up your daily movement into periodic bouts of shorter duration, you can keep your brain humming and your cells nourished and waste-free. Take walking breaks!
(5) When you sit, sit “skillfully”
Sitting is a full-body movement skill.
When I sit, I sit directly on the floor, and I constantly change between many positions so that my spine, hips, knees, ankles, feet, and toe joints never freeze up from holding any static posture for too long.
This practice has allowed me to vastly diversify my movement repertoire throughout the work week without requiring any additional “gym time”, while boosting my mental awareness and engagement during working hours (it’s like movement coffee!).
If we reflect back on the concept of ergonomics in terms of the quality and variety of body positions we adopt throughout the day, and how frequently we transition between those positions, it becomes evident that “sitting”, when redefined as a broad category of various full-body-active postures amongst which we regularly transition, can in fact be a healthful exercise unto itself.
In my office, I will often sit on the ground while setting my laptop (at a healthy height!) on a four-legged, bench-height coffee table, underneath which I have plenty of space to alternately fold and/or straighten one or both of my legs into various sitting, crouching, kneeling, and squatting postures.
Meanwhile, I type on a USB-plug-in keyboard that I rest atop a large, broad wooden pad (which I repurposed from a discarded under-the-desk footrest) that sits in my lap at a downward-slanting angle. It sounds crazy, and it kind of is, but it is also exceedingly comfortable, versatile, and the whole arrangement cost me $0.00.
If you don’t have a moveable laptop, don’t have repurposable “junk” lying around the office to use as a floor-friendly keyboard tray, or simply don’t feel like owning your crazy and embracing the floor-sitting office-bohemian lifestyle, then you can always improve on traditional chair-sitting by mastering a few basic chair-based postures that dramatically improve your joint health, blood flow, and muscular activation relative to traditional passive postures.
And again, simply by having a few different postures to transition amongst, you’ll be staving off the worst outcomes of static desk time.
So if you are chair-bound, try as many different leg configurations as you can throughout the day, making adjustments to your screen and keyboard height as you go:
- Keeping your first foot on the floor, bend your second knee so that your second foot rests across your first knee. In this position, you can “floss” your hip into and out of contraction by slowly “oscillating” (in a controlled manner!) your second knee up and down relative to the floor. You will feel a stretch-contraction begin in the side of your hip closest to your second knee that radiates upward into your low back, which when sustained or cycled in moderation can counteract some of the “closed hip” and “rounded low back” effects of prolonged traditional sitting. After awhile, switch legs!
- Keeping your first foot on the floor, bring your second knee up to your chest so that your second foot is flat against your chair seat. With light-to-moderate force, drive your second foot down into your chair seat, almost as if you were trying to stand up onto that foot. Then, and only if you are able to do so while maintaining a straight back, you can bring your straightened torso toward your second knee that is bent near your chest, while continuing to exert light-to-moderate downward force through your foot and into your chair seat. You will feel a stretch-contraction that radiates from your glute (nearest your second leg) upward into your low back, which when sustained or cycled in moderation can (as with the first pose) counteract some of the “closed hip” and “rounded low back” effects of prolonged traditional sitting. And again, be sure to switch legs!
- The Lego Squat. If your chair is big enough, try sitting in it using the position demonstrated in this video. Similar to the second pose, you can play with driving your raised-knee’s foot into your chair seat and leaning into your raised knee, and playing with either sustaining or cycling through the stretch-contraction you feel in your hip and low back. After a while, switch legs!
Change your environment, change yourself
For many of us, the office is where we spend most of our waking hours, and thus it is where most of our physical adaptations occur.
But as human beings, we need not let adaptation be a one-way street: instead, we can mold (and remold) our workstations to meet our bodies, even as we take note of the many ways that our environment molds us back (not *always* a bad thing, depending on the environment!).
And by taking regular movement breaks, and by broadening our definitions of “sitting” and “standing” to encompass a wide variety of postures between which we can regularly transition, we can begin to unfix the not-so-fixed constraints we may have once assumed about our circumstances.
If there is anything I have learned from studying human movement, it is that everything changes, and can be changed, all of the time.
And as ever-adapting humans, we have more power to change (both ourselves and our environments) than we often credit ourselves for.
So give these five tips a try – and see what changes.